You'd be forgiven for looking at the title of this post and wondering just what it is I'm going to write about, so let me shed some light on the situation.
I make no secret of the fact that I am living with Fibromyalgia, Chronic Fatigue Syndrome and Joint Hypermobility Syndrome but, as much as possible, I try not to let it affect my Make Up World although sometimes, understandably, the 2 collide - today is one of those days.
I had a very busy day yesterday working at a Hair Show put on by a local College and, today, I'm paying for it.
Long story short is that this morning when I woke up I felt incredibly rough and have been in considerable pain all day.
Usually when I am feeling this bad I don't bother with make up, however, today I thought that I would at least try and put something together. I have occasions when I feel like this and have no choice but to go out, for example on the School Run, and the last thing I want to do is face the general public without some sort of face on, least of all when I am feeling (and looking) beastly. When those occasions present themselves, this is usually the sort of look I go for (hence the name Fibro Face), so I thought I would share it. I'm not saying you need to have Fibro in order to wear this make up, after all, we all have rough days where we could, at least, do with looking better than we feel, so I hope this post helps people achieve that.
When you're feeling horrible, the last thing you really want to be doing is spending ages doing your make up or worrying about getting it looking too perfect, so the products I've chosen are all easy to work with and are great for perking the skin up.
 |
| © Gemma Peters - Make-Up Artist 2013 |
The biggest problem I have when I feel rough is that my skin automatically shows it. This can be through my face looking dull and/or very tired looking eyes.
As this particular make up look doesn't use a lot of products, I decided that I wouldn't use a primer but, of course, if you prefer to do this then you can.
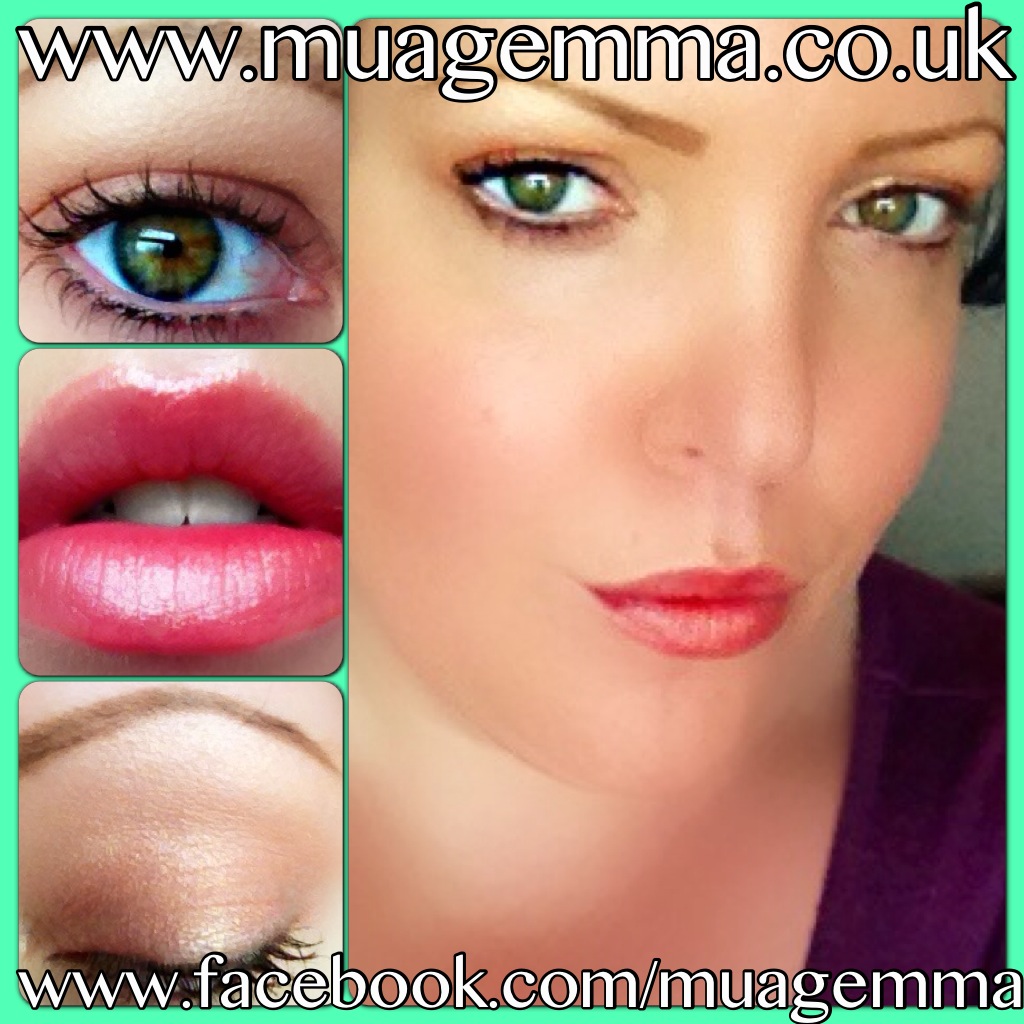
The first product I applied after moisturising was Famous Cosmetics' Bronze Highlighter. This is a liquid Bronzer with a gorgeous shimmer in it. I applied this across my cheekbones, down my nose and across my forehead (all the places that the sun naturally hits). This instantly lifted and brightened my skin and, generally, made me look healthier.
It's not necessary to put foundation over the top of the bronzer but, out of personal preference, I then applied Almay Pure-Blends foundation; this product is more like a tinted moisturiser and I therefore applied it as a moisturiser. Rather than leave my skin looking like it had product on, it just helped even the skin tone out and added a healthy glow.
I then applied a little of MUA (Make Up Academy)'s Radiant Under Eye Concealer from their "Undress Your Skin" Range. I applied this under/around the eye area and blended it in gently with finger - this instantly brightened my eyes and helped to stop me looking so tired and worn out.
If you don't suffer with skin prone to shine you could skip straight to blusher but, because I am prone to shine/oily patches, I dusted a little of MUA's Matte Perfect loose powder across my t-zone and chin.
To add a healthy flush to my cheeks I wanted a subtle coloured blusher that also had some shimmer in it. Accessorize's Merged Baked Blusher has just the right amount of shimmer in it to pick the skin up and, because it is merged, it has a flattering combination of tones to suit most skin.
Moving on to the eyes. I didn't want the "heaviness" of an eye shadow, nor the intense shimmer of a pearl shadow. I decided that MUA's Shimmer Kisses Bronzer would be an excellent alternative. It has 4 squares of complimentary colours that, when merged together, provide a beautiful wash of highlight for the face but, used separately, can be a perfect alternative for eyeshadow.
Moving on to the eyes. I didn't want the "heaviness" of an eye shadow, nor the intense shimmer of a pearl shadow. I decided that MUA's Shimmer Kisses Bronzer would be an excellent alternative. It has 4 squares of complimentary colours that, when merged together, provide a beautiful wash of highlight for the face but, used separately, can be a perfect alternative for eyeshadow.
I used the shade on the bottom left of the palette across the eyelid and then blended the shade in the top right into the crease of my eye, up towards the browbone. I then put a little of the shade in the bottom right of the palette under the eyebrow and in the inner corner of my eye to brighten it.
To finish the eye look I used 2 coats of MUA's brown mascara and put a slick of their white eyeliner in the waterline.
I have to define my eyebrows (on account of them being practically non-existent) but, rather than use my usual darkest shade, I used a blonde shade instead, which automatically made my face look less harsh and "done". It looks much more natural, and very pretty too.
I finished the overall look by applying Look Beauty's Pout Stain in Pucker Up Peach to line the lips and add more of an even tone to them and then topped with a slick of Revlon's Lip Butter in Peach Parfait.
This look isn't as heavy as some of my recent looks but for perking up the face and making me feel a little better about myself it is perfect. I also think this would be a good look for Summer parties, etc., as it is minimalistic yet pretty.
 |
| © Gemma Peters - Make-Up Artist 2013 |
You can find more examples of my "Face of The Day" over on my Facebook Page.
Until next time, stay beautiful.
~ Gem xx
DISCLAIMER
All of the views expressed within this blog are mine and mine alone.
I am in no way affiliated with any of the companies/products mentioned or their employees.
All of the products mentioned within this post are mine and were bought and paid for by me.
All images in this Blog are taken by me, unless stated otherwise. PLEASE DO NOT take my photos without my express knowledge and consent.


